Today I share one of my favorite photographers' story on how focusing on shooting what you love can lead to your dream career in photography.
Chris Burkard is one of the world's most well-known and successful adventure photographers and his advice is simple: SHOOT WHAT YOU LOVE.
Welcome to my channel! Aside from my films, I post weekly videos about life an emerging artist, in the hopes that the things I'm learning and doing will be helpful to you on your own journey, either as an artist or a person who wants to live a more creative and fulfilling life.
How do you think of original ideas if you're not naturally creative? I learned that a simple change of mindset can unlock the creativity we all are capable of.
About my YouTube channel: Aside from my films, I post weekly dispatches from my life as an emerging artist, in the hopes that the things I'm learning, doing, and dealing with will be helpful to you on your own journey, either as an artist or a person who wants to live a more creative and fulfilling life.
My main resource for this episode is The Creative Thinker's Toolkit by Professor Gerard Puccio from The Great Courses on Audible: https://www.audible.com/pd/The-Creati...
It's finally here! Exploring a place of ever-changing sunsets and strange, beautiful light, THE LIGHT IN THE NORTH is a time-lapse film shot over two months in the transition from autumn to winter in a single remote town between a mountain and the sea in northwest Iceland. Produced during the Nes Artist Residency in Skagaströnd, Iceland.
Watch the behind-the-scenes here:
Gear used:
Sony A7RII Sony 24-240 f/3.5-6.3 Samyang 24mm f/1.4 Samyang 14mm f/2.8 Sony Zeiss 55mm f/1.8 Sony RX100IV Edelkrone SliderPlus XL with Action Module MeFoto RoadTrip Tripod Varavon Battery Pack for A7 series
Edited using LRTimelapse, Adobe Lightroom Classic CC, and FCP X
Metal prints are one of my favorite ways to display my photos! While traditional paper prints will always be my go-to for maximum consistency and archival quality, metal prints provide me with a modern and striking way to display my work at large sizes. My best and largest metal prints are currently on exhibit at WeCube Inc. and I invite everyone to come check them out, and attend my artist night on Wednesday, Jan. 25, 2017 at 7:30 pm.
In this video tutorial, I explain:
What metal prints are and how they are made
Reasons to consider printing on metal versus doing traditional framed paper prints
and how I prepare my images to get the best results for my metal prints.
My two newest 20x30 inch metal prints
For those who want to try metal prints but may be scared of the relatively higher cost, great news: Photobook Worldwide has given me a discount code for 60% off on metal prints valid until March 31, 2017! Just create your metal prints at www.photobookworldwide.com, find your local website (I use www.photobookphilippines.com) and input AARONPALABYAB under voucher code.
And don't forget to share your metal prints with me via e-mail or one of my social media channels!
Back with another tutorial/demo video! In this video I take you through the relatively simple process I used to edit this photo entitled "Under Guiding Lights."
Just back from Batanes as part of a large group of bloggers and other media people who were there to try out the photography features of the Asus Zenfone 3 line of mobile phones, courtesy of Asus Philippines. I was there mainly as a resource person on shooting the Milky Way, and I was intrigued about the possibility of pulling off Milky Way shots using a mobile phone. How did it turn out? Find out by watching the video above and seeing the final images below!
One of the headline features of the Asus Zenfone 3's camera is its built-in manual mode that allows you to go all the way to ISO 3200 and do long exposures of up to 32 seconds. (For comparison, using the $3.99 645 Pro app on my iPhone 6, I get up to ISO 2000 and a 1/2 second exposure at most, on f2.2.) Combined with its large aperture f/2.0 Largan lens, this would theoretically add up to the standard exposure settings for a wide angle Milky Way shot.For this post, I'm focusing exclusively on shooting the night sky and the Milky Way, saving my overall thoughts on the photography and video features of the Zenfone 3 for a post in the coming week.
This post has been a long time coming: a showcase of the incredible night skies I experienced back in April 2016 on the Akiki Trail of Mt. Pulag. The quantity and quality of images I shot on that one trip was easily worth 3-6 months of average shooting. On this post, I take you through my best shots of the trip and the process of shooting and post-processing them --- in effect, this is my first virtual night sky workshop!
And coolest of all: my first 180-degree VR panorama of the Milky Way!
The trek on the Akiki Trail --- known as the "Killer Trail" for its seemingly never-ending steep ascents --- is worth a Photo Diary of its own, but for this post, I'll be focusing solely on the night sky shots.
Coming into the trip, I was optimistic and excited to shoot the night sky because the conditions were just right:
It was the peak of the Milky Way season in the Philippines, right in the middle of the summer;
It was just after the New Moon, and the weather forecast was good;
I had two full nights to shoot because it was a three day trek;
and, because we were on the difficult Akiki Trail, it was guaranteed there would be few other hikers to ruin my shots with their errant headlamps and indiscriminate selfies.
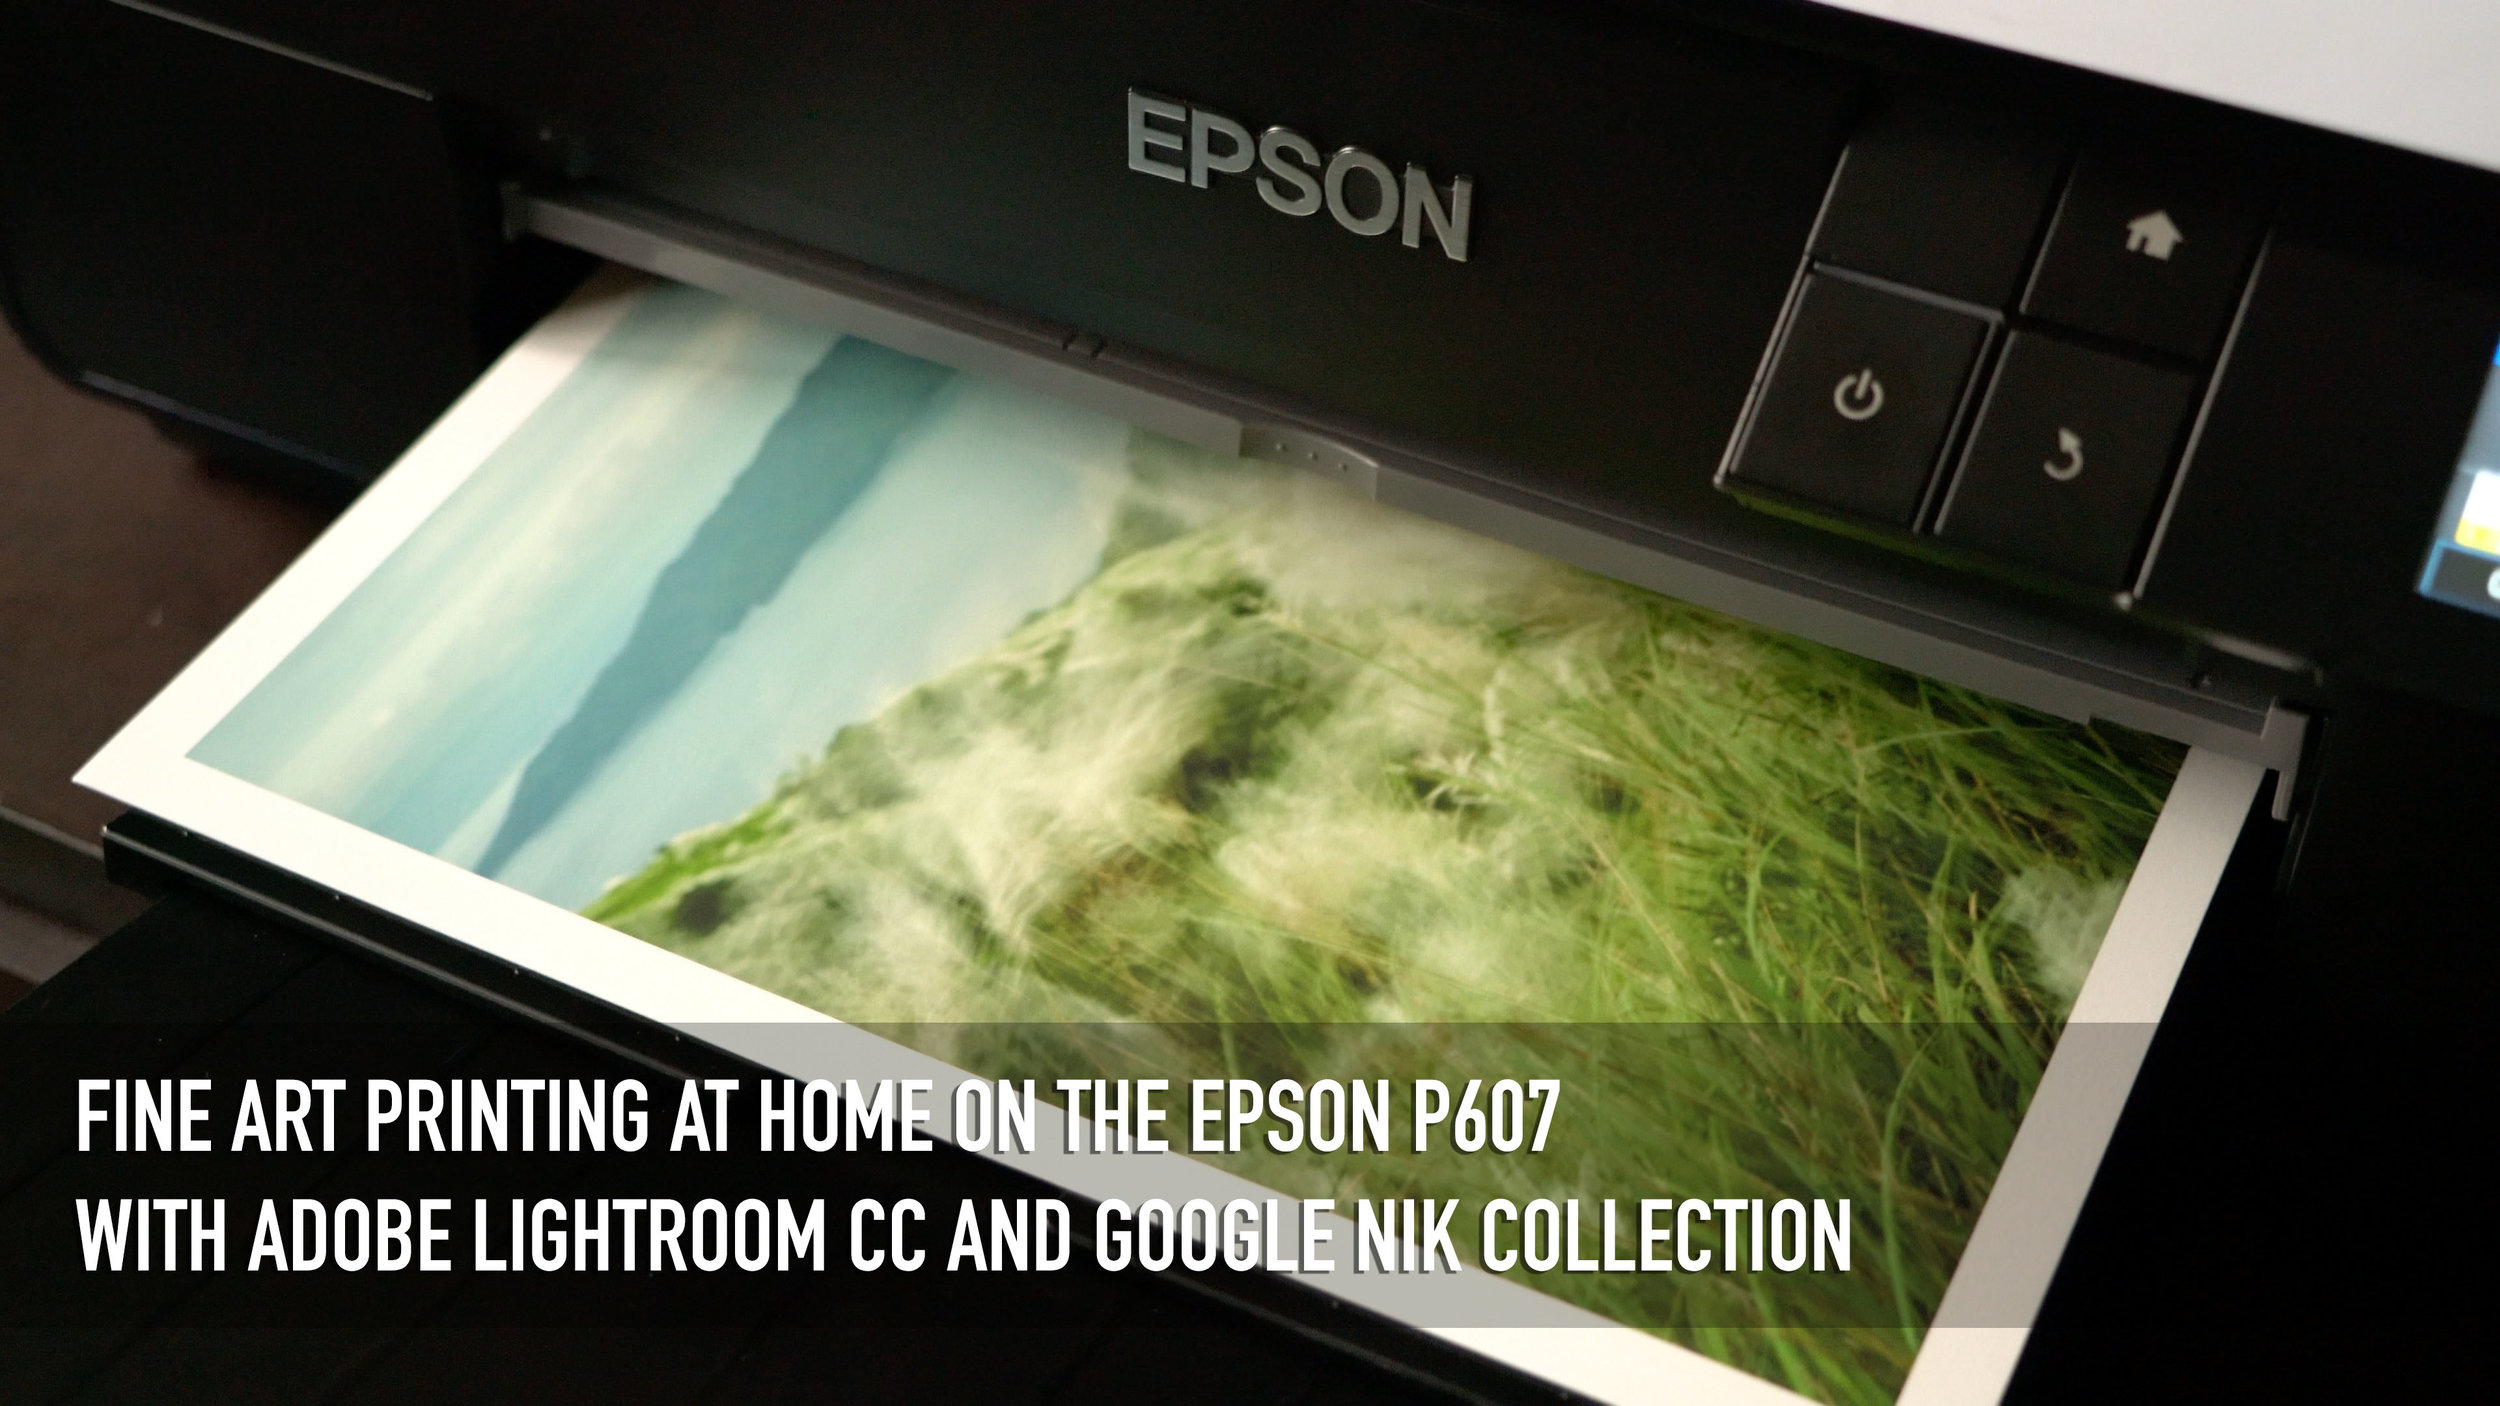
Finally got around to making a video on one of my favorite topics: printing! This is one of the most technical but also most rewarding aspects of photography, as many photographers insist that it's not a photograph until it's printed. This is quite a deep topic that I've spent many, many hours studying both online and under the guidance of my mentor, but I hope this demonstration both gives you a decent overview and whets your curiosity about all the work that goes into fine art printing.
Following up on my previous guide to shooting the Milky Way, this quick and easy tutorial is meant to give beginners a solid starting point for editing Milky Way and night sky photos in Adobe Photoshop Lightroom. While it doesn't address the finer points of a perfect Milky Way edit, it will definitely give you a more visible and dramatic Milky Way galactic core and can save photos taken in less-than-ideal night sky conditions.
A summary of the basic workflow I followed in the video:
Set your camera calibration to Adobe Standard and turn on automatic Lens Profile Corrections for your lens. If not available, try to manually select your lens from the dropdown menu.
Set Contrast to 100 and compensate overall brightness using the Exposure slider.
Bring down Highlights slider to minimize effects of light pollution.
Set white balance by maxing out Vibrance and Saturation, then moving the Temp/Tint sliders until you have a balance of yellow, blue, magenta, and green. Set Vibrance and Saturation back to 0.
Increase Clarity to taste, taking care not to introduce unwanted artifacts and too much noise into the photo.
Apply Noise Reduction. Attempt to minimize grain without smooshing out detail excessively.
From here, you can proceed to perfecting the photo with localized edits, composites, dodging and burning, etc. Hope this helps! Til next time.